Tracker Creation
Before one can define what fields and field values to use in a tracker, it must first be created. Tracker creation can be accessed from the “Create a New Tracker” menu item that is available in the tracker service page.
How to access the tracker creation page
This leads you to a 2 steps tracker creation process:
Choose the tracker template
You have first to choose a tracker template that will be used as a basis.
Note
Using a template doesn’t mean you have to stick to the list of fields and field values defined in this template. You can always add or remove fields or fine-tune the whole configuration settings afterwards.
Create a new tracker
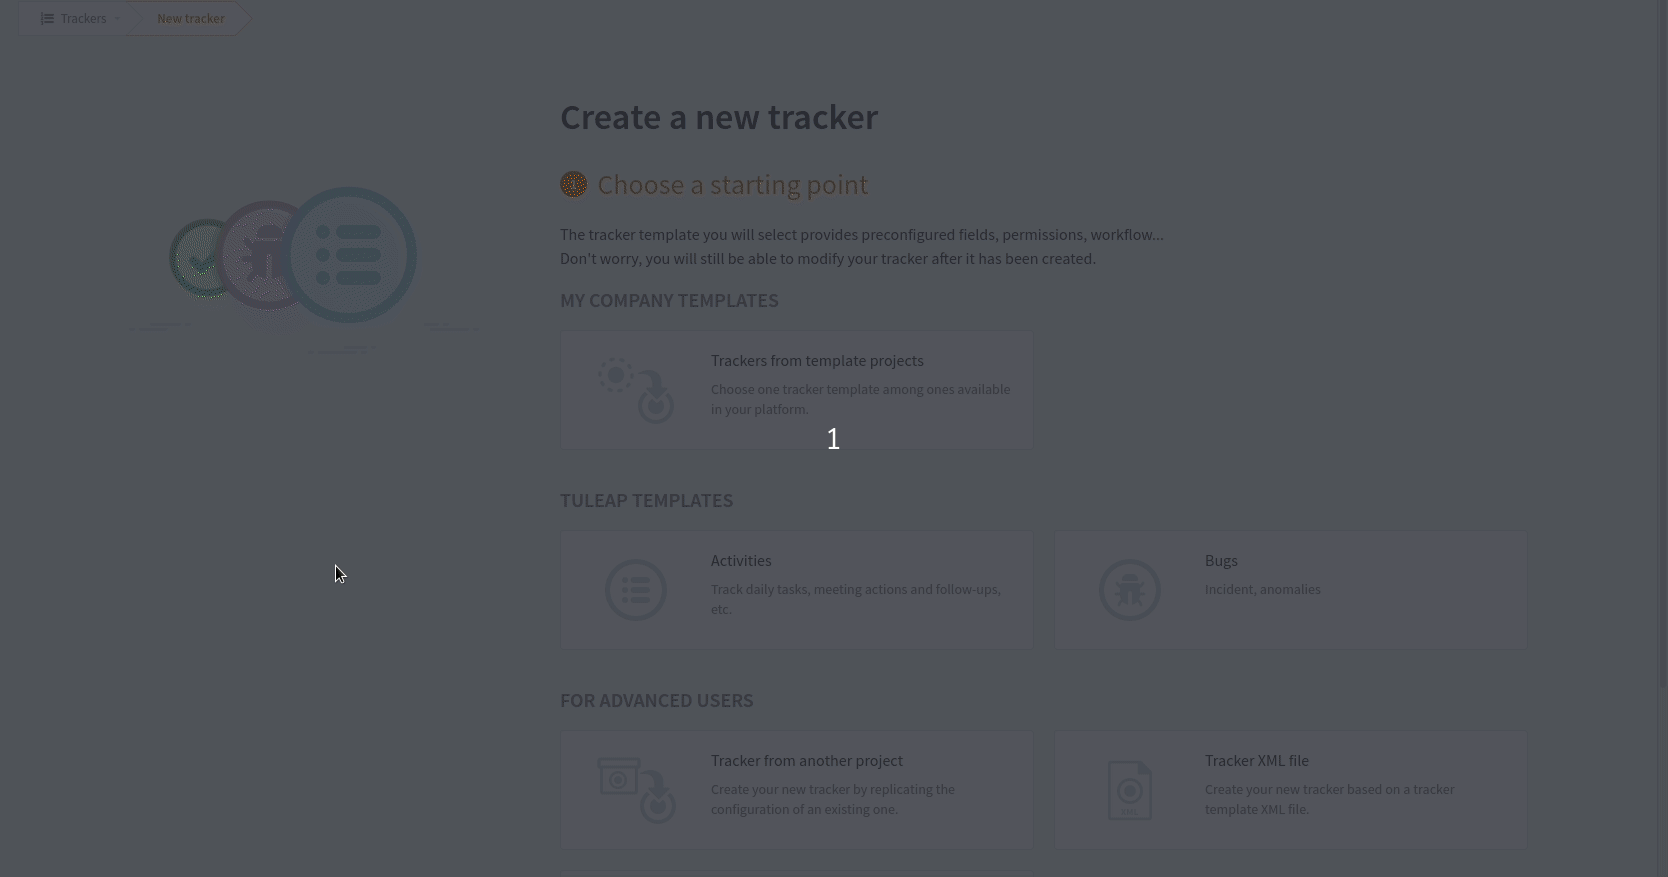
It is divided in 3 parts:
Your Company tracker templates
Tuleap tracker templates
Advanced user part
Your company templates
In this part, you can choose amongst all the trackers that has been designed by your company. Pick one and click on “Next” at the bottom right of the page.
Choose a tracker from your company project templates
Tuleap tracker templates
In this part, you can choose amongst all the trackers that has been designed by Tuleap for you. Pick one and click on “Next” at the bottom right of the page.
Choose a tracker amongst Tuleap templates
Advanced user
In this part, you can choose to use :
a tracker from an existing project you’re admin of, that is not a template designed by your company. That means you can reuse a tracker you have already set to your process.
Choose a tracker amongst the projects you’re admin
Note
This does not copy the artifacts of the original tracker but only the configuration settings.
an empty tracker: this is useful if you want to create your tracker from scratch
an XML structure file: if you have an XML structure of a tracker, from another project or another Tuleap platform, you can import it. The expected XML file describes the structure of the trackers, the fields used, the values of the fields, and the permissions. Most of the time, you will use an XML file coming from a tracker structure export (see Tracker Structure Export). This feature is really convenient to copy a tracker from a server to another.
Note
This does not copy the artifacts of the original tracker but only the configuration settings.
Create from Jira issue
Import prerequisites
Before doing the Jira issue import, you have to check the following points:
Users email addresses are visible to anyone in the Jira configuration (must be done by each user)
The Jira user used to do the import must be administrator of your Jira project in order to have all the issues and all the content possible.
Jira issue import is only done asynchronously. Once finished, you will receive an email with the status and the output of this import.
Process the import
In this part, you can choose to import a bunch of issues from a Jira instance.
Import issues from Jira
To import your Jira issues, you have to provide:
The Jira instance URL
Your Jira account email for Jira Cloud (or login for Jira Server)
One of your Jira API token for Jira Cloud (or password for Jira Server)
Then, you are able to select a Jira project and an issue type. Once all selected, the Jira import is queued.
Imported data
All the issues of the selected type in the selected project will be imported. The import is able to deal with the following fields:
Jira system fields
Field type |
With history? |
|---|---|
fixVersions |
|
versions |
|
components |
|
summary |
✅ |
description |
✅ |
duedate |
✅ |
priority |
✅ |
assignee |
✅ |
reporter |
✅ |
labels |
✅ |
status |
✅ |
attachment |
|
story_points |
✅ |
Jira custom fields
Field type |
With history? |
|---|---|
com.atlassian.jira.plugin.system.customfieldtypes:textfield |
✅ |
com.atlassian.jira.plugin.system.customfieldtypes:textarea |
✅ |
com.atlassian.jira.plugin.system.customfieldtypes:float |
✅ |
com.atlassian.jira.plugin.system.customfieldtypes:datepicker |
✅ |
com.atlassian.jira.plugin.system.customfieldtypes:datetime |
✅ |
com.atlassian.jira.plugin.system.customfieldtypes:radiobuttons |
✅ |
com.atlassian.jira.plugin.system.customfieldtypes:multiselect |
✅ |
com.atlassian.jira.plugin.system.customfieldtypes:select |
✅ |
com.atlassian.jira.plugin.system.customfieldtypes:userpicker |
✅ |
com.atlassian.jira.plugin.system.customfieldtypes:multiuserpicker |
✅ |
com.atlassian.jira.plugin.system.customfieldtypes:multiversion |
|
com.atlassian.jira.plugin.system.customfieldtypes:version |
|
com.atlassian.jira.plugin.system.customfieldtypes:multicheckboxes |
Comments are also imported. The issue history is recreated.
Jira issue links
Attention
Issue link types must be created on Tuleap before the import is done, otherwise the link type will not be imported.
When importing a solo issuetype, all links between issues from this selected issuetype are imported. Links done between issues with different issuetypes are skipped. All Jira project’s issues links are imported when doing a full project import.
User mapping
Attention
The Jira user email address can only be used if the user allows the address email visibility in the Jira API. More information here. If this is not done, the import process will map the Jira user to a default Tracker Importer Tuleap user
The Jira import process will try to map the users found in the Jira data with Tuleap users:
Issue creator
Issue updater
Commentator
File uploader
Users in field values
To be relevant, the mapping is based on the email address. If the Jira user email address map a Tuleap user email address, then the mapping is done.
All the details about the mapping will be displayed in the Jira import output in the email.
Fill informations about your tracker
To finalise your tracker creation, you then need to fill some informations:
Name: this is the name of your tracker. A tracker is typically named after the type of artifact it is going to manage. This name will be used by Tuleap in the title of the various screens of the trackers. It is predefined with the same name of the chosen template
Colour: choose the color of your tracker. It is used in various screen of Tuleap.
Description (Optional) : A longer description of what this tracker is all about and the type of managed artifacts.
Short name (Predefined): this is a short name that best describe the type of artifact managed in this tracker. This name must be quite short as it is used in various screens of the Tuleap Tracker like the artifact update form where it appears in the tracker menu and also next to the artifact ID. Following the examples given for the Name field above, short names can be: AR for Action Request, SR for Support Requests, Reqt for Requirements, bug for Bugs…
It is predefined by Tuleap, but you can modify it.
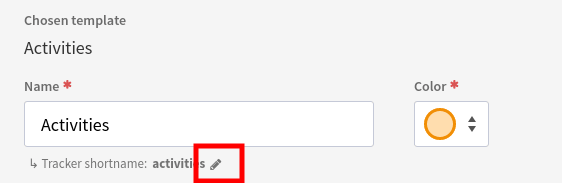
Choose your own shortname
If this shortname already exists in your project, you will be invited to choose another one.
How to create a new tracker
Once this second step validated, you will be able to start using your tracker as is, or continue the configuration.
Note
You can modify your tracker configuration at anytime during your tracker life.