Project Management
Creating a New Project
So - you are a freshly registered Tuleap user and you want to make your developer or project leader life easier. In other words you want to:
Avoid the pain and cost of creating your own project infrastructure (with servers and backup)
Avoid paying a premium price for commercial version control, defect tracking and task management tools
Quickly setup a project environment that you can share with your colleagues, your partners, your contractors or your customers where ever they are while keeping your information safe and under control.
Make your organization globally more productive and efficient by possibly letting others re-use your software and build on it.
If any of these points is appealing to you then you should definitely host your software project on Tuleap. Let’s see how you can do that.
Project Registration
Before you create a new project you must be a registered user (see Type of users). You then login and select the item “+ New Project” in the “Projects” dropdown of Tuleap Main Menu.
The project registration is a two steps process:
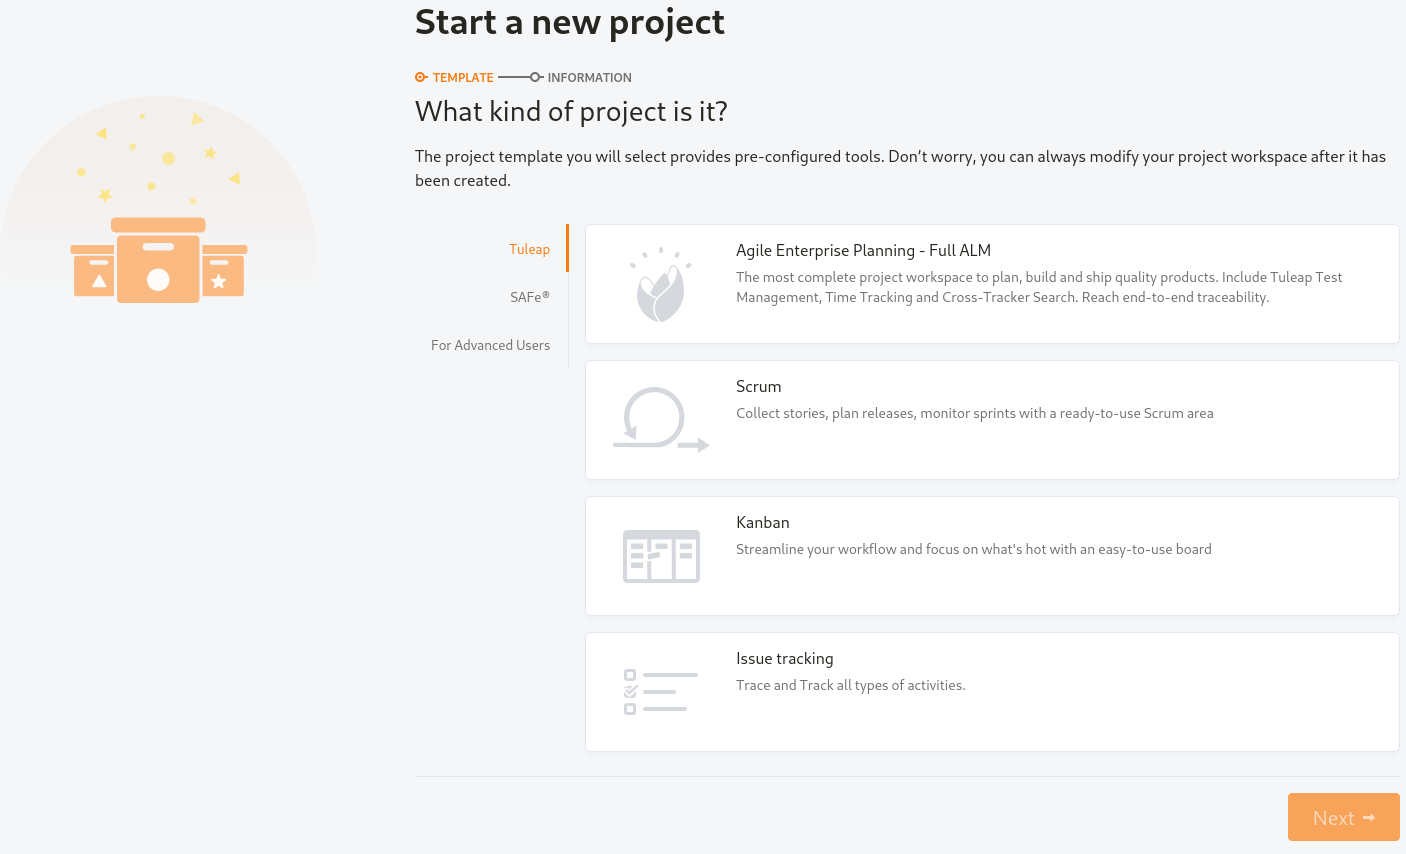
Choose a template : Templates are divided in 3 categories:
Your company templates: some companies are proposing predefined templates in order to provide templates in compliance with the processes defined in your company
Tuleap templates: ready-to-use templates in order to help you start your project
For Advanced users: if you need to reuse the configuration of one of your project. You need to be project administrator of that project to be able to use it.
Project Information
Choose the name and the visibility of your project (see Project’s permissions), and add a description if you need. You will be able to add one after the creation.
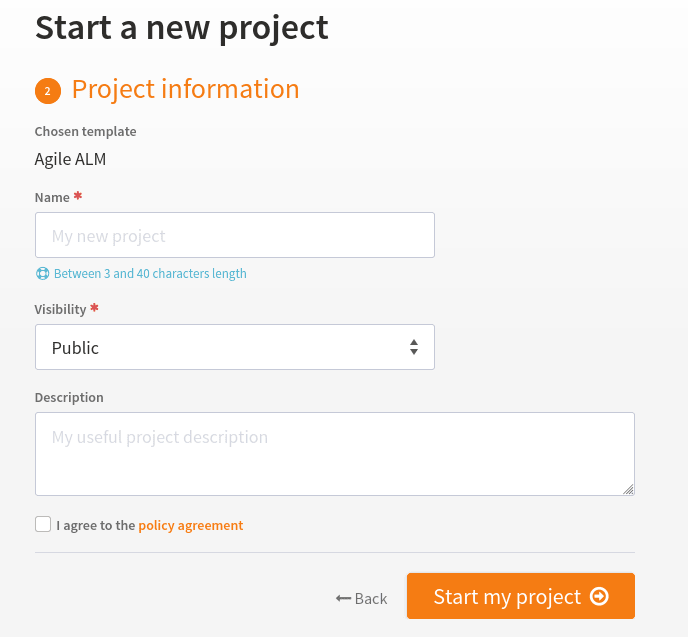
Some platforms may have more fields to fill. Tuleap offers the possibility to add more project information if you need (see Categories).
The new project will use exactly the same configuration as the template. This includes that:
the new project inherits the same dashboards and widget for project home page
the new project is classified into the same trove categories as the template project (see Categories).
the same services are enabled (see Service Configuration). Unavailable services won’t be present. Disabled services will be disabled by default.
the same reference patterns are defined (see Reference Overview).
the same project specific user groups exist (see User Groups).
all trackers with the option “instantiate for new projects” are copied with their associated fields, field values, field dependencies, reports, and permissions (see ?).
the test management configuration is copied (This module is part of Tuleap Entreprise)
the backlog configuration is copied
the kanban boards are copied
the same forums are created (but the messages are not copied).
the documents, as well as the document tree will be present.
the SVN admin settings are copied but the emails and the SVN access permissions are not copied.
the Git admin settings and global permissions are copied, but the emails and the Git access permissions are not copied.
the file packages and their permissions are copied
If you create a new project from an archive, the provided archive must contains the project structure only. Data (like artifacts or users) must not be included. To create an archive with only the project structure see Project Structure Export
After you validate the project registration, the Tuleap Team in charge of your platform reviews the information you submitted and decides to approve it or not. Note that some platforms automatically approve new projects. Shortly after the Tuleap Team approval you’ll receive an e-mail summarizing the characteristics of your project including a pointer to your new “Project Dashboard” page.
Create project from Jira
Attention
This feature is provided by package tuleap-plugin-jira-import it must be installed and activated by a site administrator
first.
This module is part of Tuleap Enterprise. It might not be available on your installation of Tuleap.
It’s also possible to create a new project by importing data from a Jira project.
At the moment, this requires a site administrator action on the server because the feature is only available in tuleap CLI:
tuleap import-project:from-jira \
    --jira-host JIRA_HOST \
    --jira-user JIRA_USER \
    --import-mode multi-trackers \
    --tuleap-user TULEAP_USER_LOGIN \
    --shortname TULEAP_PROJECT_SHORTNAME
This command works with Jira REST API so Tuleap server must be able to reach the Jira instance (JIRA_HOST). In addition to that:
The Jira user (
JIRA_USER) used to do the import must be administrator of your Jira project in order to have all the issues and all the content possible.When importing from Jira Cloud, the Jira user must first generate a token on the Jira instance (they will be prompted for the token when they launch the command).
When importing from Jira Server,
JIRA_USERis the regular login used on Jira instance and when prompted for credentials, it’s the Jira Server password that should be provided.- For best conversion, Jira users’ email addresses should visible to anyone in the Jira configuration (must be done by each user).
if Jira users do not disclose their emails, everything will be owned by a “Tuleap importer” user.
This command will import:
- In
multi-trackersmode: all Jira issue types (as trackers) with all issues (as artifacts) with their comment and history of field change (best effort, more details here),
the links between issues with their types (related to, duplicate, etc). This includes sub-tasks as well as epics.
all worklog as time tracking,
Board and Sprints with associated issues and backlog.
- In
- In
mono-trackermode: all issues (as artifacts) with their comment and history of field change (best effort, more details here) in a unique
Issuestracker,the links between issues with their types (related to, duplicate, etc). This includes sub-tasks as well as epics.
all worklog as time tracking,
A simple Kanban will be activated.
- In
Attention
Issue link types must be created on Tuleap before the import is done, otherwise the link type will not be imported.
A given Jira project can have many Boards with different configurations. There is no equivalent concept in Tuleap so the importer arbitrarily choose the first declared board.
Jira API doesn’t expose what kind of issue type is an Epic so, by default, the importer relies on the naming and will
pick the Epic issue type. If this label was modified in your project, you can tell the new name to the importer with
--jira-epic-issue-type option.
The project is created and activated as soon as the command ends with TULEAP_USER_LOGIN as sole project administrator.
By default the project privacy is “private”. A --visiblity option can be used to defined the Tuleap project visiblity at import.
The import-mode is an optional CLI option to choose how to import Jira data. If not provided, the import is done in multi-trackers mode by default.
Note
While the import of an entire project is a Tuleap Enterprise feature, the import of a single issue type with issues and history is available on all versions of Tuleap.
Post-Registration Configuration
The first thing to do after you receive the confirmation for your project registration is to visit the “Project Dashboard” page (URL included in the e-mail) and finish the configuration of your project. The 2 following actions are the most frequent ones that have to be taken after a project is registered:
Categorize your project in the Software Map
If you haven’t done it during the project registration process, you should do it now! Your project categorization appears on your “Project Dashboard” page. To categorize your project select the “categorize it now” link and fill out the category form fields.
Build the project team
Once a project is created, the creator is assigned the role of project administrator on this project. It is her responsibility to define who are the project members and what their permissions are. This can be done by accessing the “Project Admin” page, typing the names of all the registered users promote as team members and then define their permissions.
Project Dashboard
The project dashboards are the entry point of a Tuleap hosted project. And, for any project, they are the only pages you need to know about. From those pages both ordinary registered users and project members/administrators can access all project resources and services. Unlike the project administration page, the dashboards are public and can be visited by any Tuleap user including anonymous ones. In some sense the dashboard display the public face of a project.
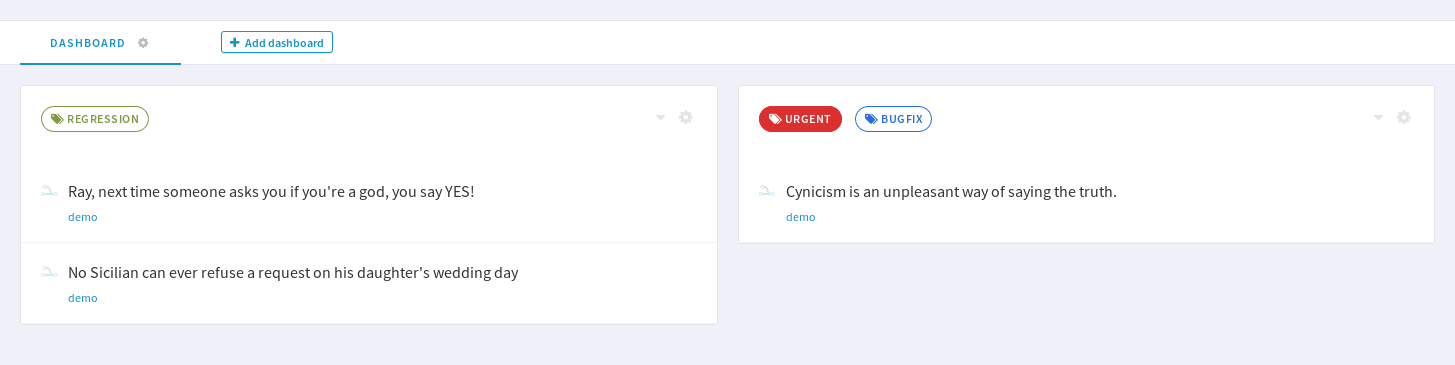
Project Dashboard content
A sample project dashboard is available below. The page is split in several areas:
The header with the project name and some indicators (project scope, number of members, …).
A navigation bar to access to each dashboard. For project administrators, this is where they can add a new dashboard, and edit or delete a dashboard. They can also add widgets to the current dashboard.
The various information presented by widgets.

An example of project dashboard
Tuleap allows project admins to personalize the dashboards. The content of the page is made of widgets. All widgets can be moved, collapsed or removed. Some of them can provide an rss feed or be edited.
Other users than project admins will see the corresponding static page. The widgets will be the same, in the same position, but they won’t be able to modify the page.
Some Widgets available on project dashboard
New widgets can be added through the dropdown entry “Add widget”. Here is an example of available widgets for the project dashboard:
Public Areas: this is an iconic list of all available services for this project along with some information next to it. Click on any of this item to access a service. The role of this area is pretty much equivalent to the sidebar except that it shows additional information about each of the service (e.g. list of trackers, …)
Heartbeat: the list of latest items updated in this project. This is helpful to have an overview of the activity of the project. Please note that not all services can push information in this widget; as of today Artifacts and Git activities are listed. Permissions apply, it means that the content of hearbeat will change from one user to another according to their permissions.
RSS Reader allows project admins to include public rss (or atom) feeds. For example the reader can display a feed published by external tools used by the project (like continuous integration).
Some widgets have documentation to explain how to configure and use them:
Kanban add a Kanban in your project dashboard.
Hudson/Jenkins permits to display many widgets for Continuous Integration.
Project Milestones displays a Scrum Backlog in project dashboard.
Label widget to track your items.
Whenever you enter the Project Dashboard of a given project or any of its service you’ll see a menu item called Admin appears in the project menu.
Only site or project administrators can access the Project Administration page. All other Tuleap users are denied access to this part of a project.
Cross-Tracker Search
You will find the documentation of Cross-Tracker Search here.
Roadmap
Attention
This module is part of Tuleap Entreprise. It might not be available on your installation of Tuleap.
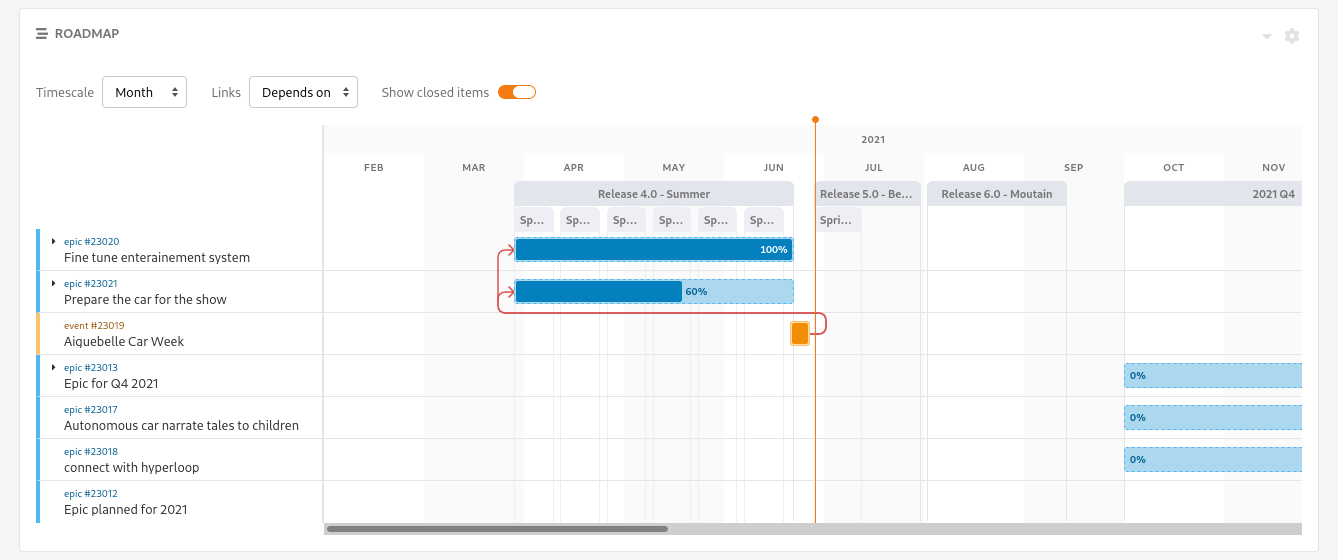
This displays the roadmap of a project in the project dashboard. It shows the progress of artifacts with:
Artifacts of selected trackers will be displayed in the widget as a Gantt chart as soon as:
they have at least a start date or a end date
the end date (if set) is greater than the start date
The percentage of progression will be displayed on tasks only if the semantic Progress is defined in the tracker (if no semantic Progress, then a plain bar is displayed instead).
Note
The widget filters out artifacts:
That are closed since more than one year
That are closed with end date older than one year
If artifact has only start date, only end date, or start date equals to end date, then it is displayed as Gantt milestone.
User can choose:
The timescale: Week, Month, Quarter
To display links between artifacts: no links (aka “None”) or a given type of links.
To display children if any (as soon as they can be displayed in the widget, see aforementionned conditions)
To hide closed items (to not clutter too much the Gantt chart when there are a lot of artifacts)
In order to give context about artifacts being displayed, the widget can be configured to display iterations on top of the Gantt chart. For example we may want to track the progress of Epic in the context of Releases. Or in the context of Releases and their Sprints.
It should be noted that:
The trackers for iterations can be chosen in the widget configuration, under the Timeframe ribbons section.
You can choose up to two levels of ribbons. Tracker of level 2 is expected to be a sub-division of tracker of level 1 (e.g Sprints vs Releases, or Iterations vs Program Increments).
Artifacts of selected trackers are expected to have continuous time. I.e. artifacts timeframe do not overlap, if it is the case the widget will not know how to display them and they will be omitted.
Old artifacts (the ones that end before the first task displayed in the Gantt) are not displayed.
Project Details
This section presents the general information about your project such as its name, its description, its visibility…

Project Type
Tuleap proposes three types of projects, that can be modified only by a site administrator:
Project: This is the type of standard projects hosted on Tuleap.
Template Project: If you choose this project type new projects can reuse this projects service configuration. When registering a new project (see Project Registration) your template project is listed as available template.
Test Project: If you just need to test what is feasible with Tuleap projects use the Test Project type for your project. Having defined that type, your project will not appear any more in the Tuleap Software Map.
Project Visibility
Site administrator can allow project administrator to change project visibility.
If you have the change visibility permission, you can change your project visibility at any time. Each time you update it, you must accept the Term Of Service of platform.
Members
Deals with project members administration.
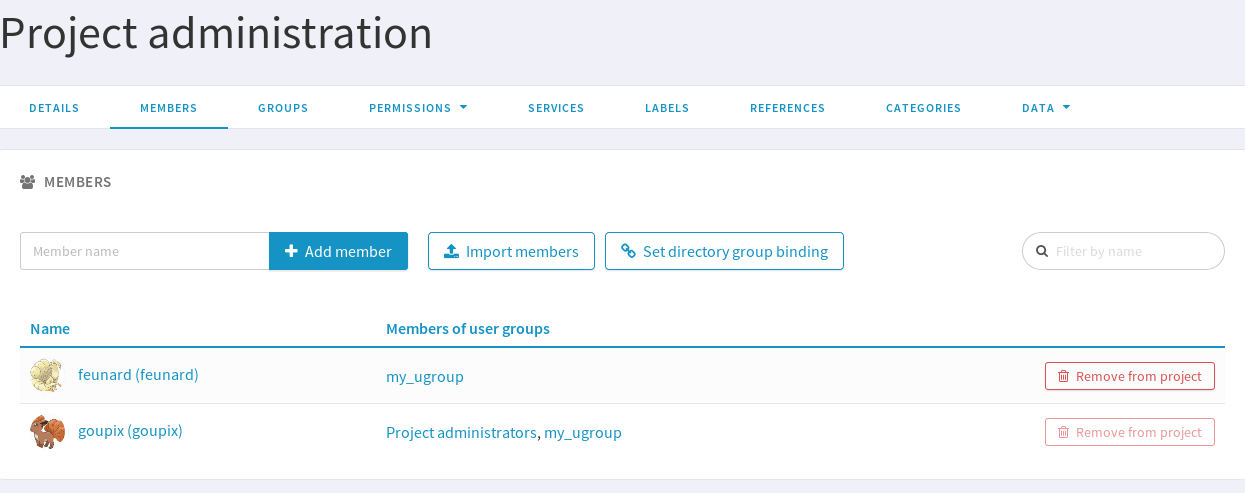
Add a user
Use the select box to add a user to the project members list.
Import a list of users
If the number of users to add is important, you can import a list of users from a simple text file. In order to do it, click on “Import Members”. Then, select a file containing the list of users you want to import. The file will host one user per line, by specifying her email address, or her username (login name).
johnd
steve.robinson@example.com

bob.johnson@example.com
smith3
john.smith@example.com
Note
The import process has two steps. First, it checks if the file is well formatted, and it displays the users detected to be imported. After a confirmation, the import is done and users are added to the project. Users displayed in warning list are not imported.
Set binding directory
You can bind your members to your enterprise directory group (LDAP, Active directory…). Once your members are bound to an enterprise directory group, you are still able to add non lined users to your project with the “Add members” button.
Removing a user
To remove a project member, use “Remove from project button”.
Revoking membership has absolutely no effect on the history and the data integrity of the project. In other words all tracker artifacts assigned or submitted by this person will continue to show up as before in the project database. Only the ability of this person to perform project management tasks is affected.
User Groups
A user group, sometimes called a “ugroup “, is simply a group of Tuleap users. User groups are used to set specific permissions to some project data (e.g. software releases and packages - see Package Modification). A user group is always attached to a project, but the users comprising the group do not necessarily belong to that project.
There are two different kinds of user groups:
System groups
Custom groups
System groups are defined by Tuleap and comes as a dependency of some services (like the group of people allowed to write News). They cannot be deleted. Those system groups are less and less used in favor of custom groups. There is only one mandatory System Group: Project administrators.
A Project Administrator is a project member with absolutely all rights over the project services, project deliverable and project members. Only Project Admin can access the project members permission page.
Custom User Groups are defined by project administrators. They are composed of a static list of users. The only requirement is that any member must be a registered Tuleap user. This list can be modified at any time, but will not automatically be updated, except if a member is removed from the project or deleted from the system.
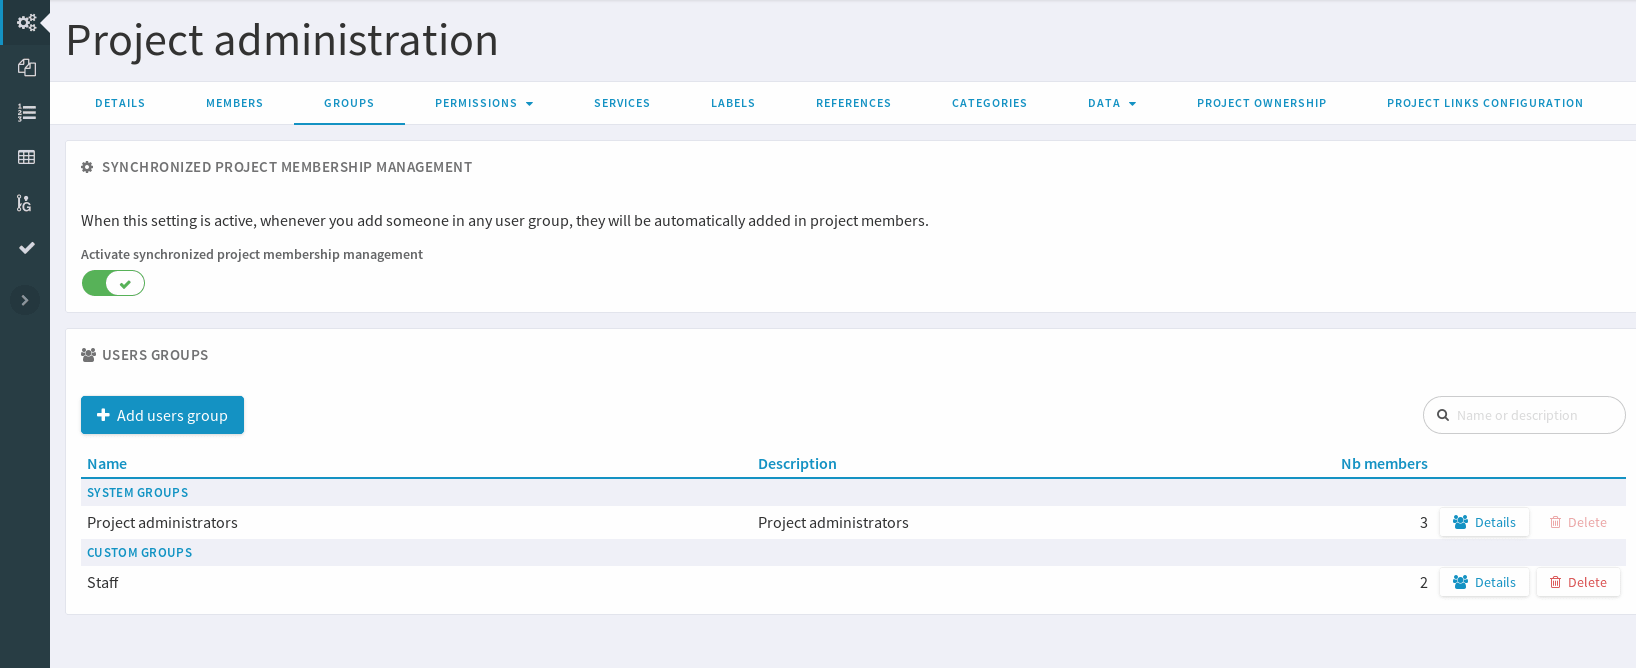
Synchronized project membership management
Note
This section applies starting Tuleap 11.4
The relationship between “Project Members” and “User groups Member” depends on visibility of the project.
When a project is Private (Only project members can see it), then adding a user as member of any Custom user group will transparently make it member of the project if the user is not already.
When a project is Public, by default, adding someone as member of any Custom user group will not make it member of the project. However, as a project administrator, you can opt-in for this behaviour (same as for Private projects) by toggling “Activate synchronized project membership management” option.
Warning
The “synchronized project membership management” doesn’t apply for groups that are defined outside the project (see Binding below). When users become members of a Custom user group via a Binding propagation or LDAP synchronization, they are not automatically added as project members.
Please note that:
Platform Administrators are excluded from the automated synchronization. They are considered being project administrator of all projects even when they are not explicitly member of.
Project Administrators cannot be removed from User Group and Project in one operation (as you can do with non project administrators). You explicitly un-grant project administration capabilities first.
Creating a User Group
Click the “+ Add users group” button to add new custom ugroup.
The create from dropdown is a quick way to pre-select group members. For instance if you choose Project members, your group will be created with all your project members by default. If you update your project members, it won’t have any incidence on the user group you just created.
Sometimes, you might want to grant some permissions to all project members and some other Tuleap users. In this case, you might be tempted to build a user group from project members and to add the other users to the group. It’s a bad way to do this: we advise you to use project members group and a second group with the non project members you want to grant permission. Indeed if you just create a group with all members, it will be painful to maintain: new project members won’t be automatically added to your custom group, each time new member is added to project you will have to update your custom group.
Deleting a User Group
User groups can be deleted. Click on the delete button next to the group name in the group management page to suppress the user group from the database. Only custom user groups can be deleted.
Warning
Please note that if a user group was specifically granted some permission, deleting the user group might be dangerous. Indeed, if a group is the only one allowed to access a package and this group is deleted, the permission is also deleted and reset to default, so any registered user can access the package.
User Groups Management
From the users groups list, you can access to details of each group and can change settings or add/remove members.
Group details: update group’s name and description.
Permissions delegation: delegate some specific permissions to users.
Group binding: link the group to another one for easier membership management.
Group members: add/remove members to this group.
See permissions: list permissions granted to this group.
Note
Only add/remove members is available for predefined users groups.
Permissions delegation
You can delegate to a users group several permissions. All the members of this group will take advantage of these permissions. Only the following permission is currently available:
Membership management: allows members of the current group to add/remove project members without having them project admin.
Binding users group between two projects
User Group Binding allows non project members who belong to a user group in another project to be allocated rights without becoming project members themselves. To do this, you need to be project admin of both projects.
Let’s do this with an example. Say there is the user group ‘some_people’ in the project called ‘my project’ and that you wish to give some rights to them in a project called ‘my software’.
CLick on “+ Add users group binding”, choose your project “my_project”, select the users group you want to be bound and add binding. You won’t be able to manage from ‘my software’ project, you will have to go in ‘py_project’ users group to manage your users
Binding users group to a directory group binding
You can bind your members to your enterprise directory group (LDAP, Active directory…). Once your members are bound to an enterprise directory group, you are still able to add non lined users to your project with the “Add members” button.
Permissions
When a project member is removed from a project, or quits a project, they are also automatically removed from all project user groups for safety reasons.
Similarly, when a user is deleted (not just suspended) by the site administrator, they are removed from all user groups in all projects.
Permissions for deprecated services
Those permissions concerns service who are in end of life:
Trackers V3:
None: the user has the same permissions on this tool as a non project member.
Administrator: tool administrators have full access to the administration part of the tools. As an example, they can define new artifact categories, new predefined values for artifact fields, etc.
SVN:
Admin: administrator of core SVN (single repository)
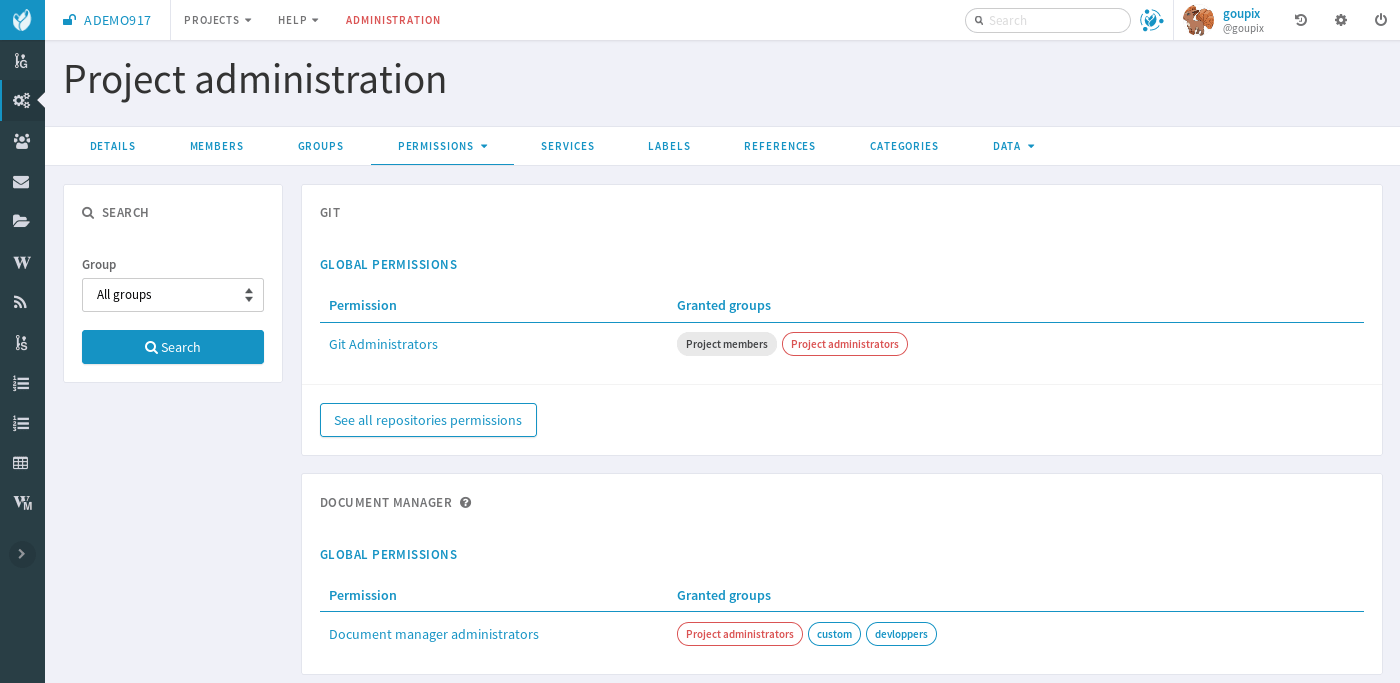
Permissions per group
This section enables you to check what can a users group do on your project. By default it displays the global permissions defined for each service in the project, if you want to check items permissions (like Git repositories, Packages, Releases …) you will have to load them individually.
You can use the filter to verify permissions for a specific users group.
Service Configuration
Services are items listed in the sidebar on each page in the project: trackers, Git, Backlog, Kanban, documentation, etc. A project administrator can update, enable, disable or even create services.
There are two kinds of services:
System services: these services are defined by the site administrator and are common to all projects. They cannot be modified, except for their status (enabled/disabled) and their position on the screen (see below).
Project services: these services can be fully customized or deleted by the project administrator.
Creating or Updating a Service
When creating or updating a service, one has to fill the following fields:
Service Label: This is the label that will be displayed in the sidebar. It should be as concise as possible. For System services, there are special values that become translated strings. Here is the list of these special values:
Service |
Service label |
Service description |
|---|---|---|
Summary |
service_summary_lbl_key |
service_summary_desc_key |
Administration |
service_admin_lbl_key |
service_admin_desc_key |
Forums |
service_forum_lbl_key |
service_forum_desc_key |
Mails |
service_mail_lbl_key |
service_mail_desc_key |
News |
service_news_lbl_key |
service_news_desc_key |
File |
service_file_lbl_key |
service_file_desc_key |
Wiki |
service_wiki_lbl_key |
service_wiki_desc_key |
Legacy Trackers |
service_tracker_lbl_key |
service_tracker_desc_key |
Legacy SVN |
service_svn_lbl_key |
service_svn_desc_key |
Legacy homepage |
service_homepage_lbl_key |
service_homepage_desc_key |
Baseline |
plugin_baseline:service_lbl_key |
plugin_baseline:service_desc_key |
Docman |
plugin_docman:service_lbl_key |
plugin_docman:service_desc_key |
Git |
plugin_git:service_lbl_key |
plugin_git:service_desc_key |
Continuous Integration |
plugin_hudson:service_lbl_key |
plugin_hudson:service_desc_key |
Mediawiki |
plugin_mediawiki:service_lbl_key |
plugin_mediawiki:service_desc_key |
SVN Plugin |
plugin_svn:service_lbl_key |
plugin_svn:service_desc_key |
TestManagement |
plugin_testmanagement:service_lbl_key |
plugin_testmanagement:service_desc_key |
Trackers |
plugin_tracker:service_lbl_key |
plugin_tracker:service_desc_key |
Service Link: This is the URL of the service, i.e. the address the user will be redirected to when clicking on the service label.
A few keywords can be inserted into the link: they will be automatically replaced by their value:
$projectname: short name of the project
$sys_default_domain: domain of your Tuleap server (e.g. “tuleap.example.com”)
$group_id: project number.
Service Description: Short description of the service. It will be displayed as a tooltip when the mouse cursor is over the service label. For System services, there are special values that become translated strings. See the table above.
Enabled: Toggling this check box will simply disable (or enable) the service. Disabling a service just means that it no longer appears in the sidebar but all existing data related to this service remains untouched. In other words, re-enabling the service will restore the service in the exact same state it was when you first disabled it. See also “Deleting a Service” below.
Rank on Screen: this arbitrary number allows you to define the position of this service in the sidebar relative to other services. The services with smaller values will appear first. The rank values don’t have to be consecutive values. It is a good idea to use values like 10, 20, 30,… so that it is easy for you to insert new services in the future without having to renumber all the services.
Deleting a Service
Project services can be deleted. They appear with a small trash icon in the service list. Just click on this icon to suppress the service from the database. The service data are however preserved.
System services cannot be deleted. However, you can disable them and they will not appear in the sidebar.
Project Labels
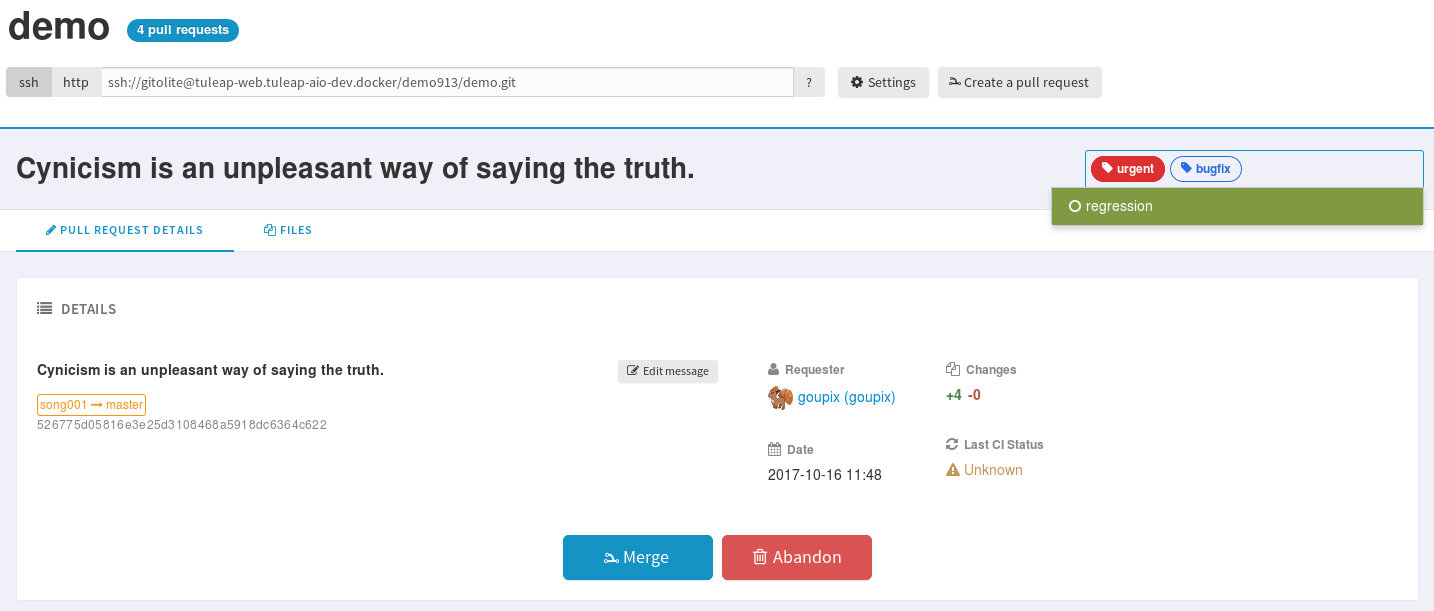
Projects labels enables you to add labels on items. With the associate widget you can see all items corresponding to given labels.
Note
For now labels are only available for pullrequest service
Add a label
You can add labels on items by click on the “+” icon. If label does not exists in project, it will be automatically created. The input will suggest you existing project labels.
Remove a label
You can remove a label by clicking on the cross in label badge.
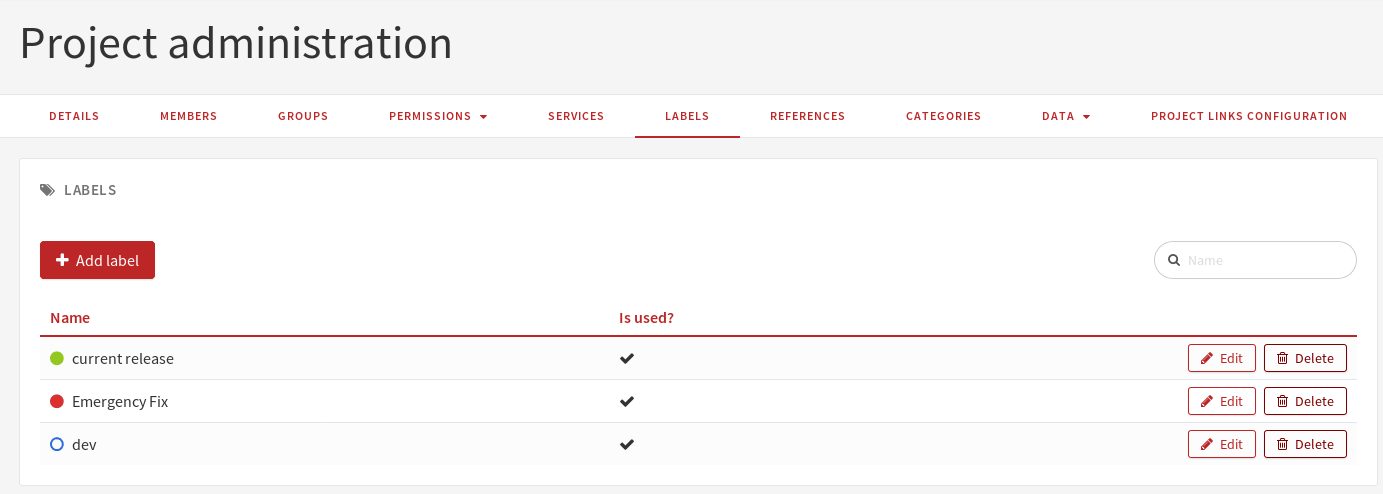
Administration of labels
If your project can use the Git pullrequest feature, the administration of labels is available for project administrators. This administration panel allows project administrators to:
Update label
Add color for a label
Remove a label
Create a new label
Label widget
Attention
This module is part of Tuleap Entreprise. It might not be available on your installation of Tuleap.
In your project dashboard, you can add several widgets to track your items:
Reference Pattern Configuration
If you are looking for how to use references, check how to use references.
A project administrator can update, enable, disable or even create reference patterns.
Reference Overview
There are two kinds of reference patterns:
System reference patterns: these reference patterns are defined by the site administrator and are common to all projects. They cannot be modified, except for their status (enabled/disabled).
Most system references are related to a specific service. For example, ‘artifact’, ‘doc’, ‘file’ or ‘wiki’ are respectively related to the tracker, document manager, file manager and Wiki services. In order to facilitate the usage of such reference patterns, they are automatically enabled and disabled when the corresponding service is enabled/disabled. Still, it is always possible to enable or disable those reference patterns manually.
Project reference patterns: these reference patterns can be created, modified or deleted by the project administrator.
Predefined Reference Patterns
Here is a list of predefined reference patterns:
art #num or artifact #num: Reference to artifact number ‘num’. Note that ‘num’ is a system-wide number and is unique across projects. This reference links to the artifact detail/update page. In addition to the ‘art’ and ‘artifact’ keywords, artifacts may be referenced using the related tracker short name. For example, an artifact in the bug tracker can be referenced with bug #NNN, a support request with sr #NNN, a task with task #NNN and a patch with patch #NNN. So, when you create a custom tracker, make sure that you specify a meaningful tracker short name.
commit #num or git #sha1: Reference to Git sha1. This is a system-wide number. The reference links to the commit details page: log message, impacted files, link to diff view, etc.
rev #num or revision #num or svn #num: Reference to Subversion revision number ‘num’. This is a project-specific number, so if you need to reference a revision belonging to another project, you should specify the project in the reference (e.g. ‘rev #myproj:123’). The reference links to the subversion revision details page: log message, impacted files, link to diff view, etc.
svn #repo_name/num: Reference to Subversion plugin repository named ‘repo_name’ revision number ‘num’.
wiki #wikipage and wiki #wikipage/num: Reference to a wiki page named ‘wikipage’. The second format allows one to specify a wiki page version. Wiki pages are project specific, so if you need to reference a page belonging to another project, you should specify the project in the reference.
doc #num or document #num: Reference to the document number ‘num’. This is a system-wide number. Document numbers, or IDs, are visible in the ‘Docs’ main page by hovering over a document title with the mouse pointer. This reference links to the document itself.
news #num: Reference to the news item number ‘num’. This is a system-wide number. The reference links to the news item page, where you can add comments.
forum #num and msg #num: Reference to forum number ‘num’ or to forum message number ‘num’. Those are system-wide numbers. The first reference links to the forum welcome page, while the second one directly links to the message page, where you can view the message thread, and post a follow-up message.
file #num: Reference to file number ‘num’. This is a system-wide number. This kind of reference allows a direct download of a file that is part of a release. File numbers, or IDs, are visible in the ‘Files’ main page by hovering over a file name with the mouse pointer. This reference links to the file itself, so you might be prompted for a location to store the file. You may also have to accept the project license before downloading the file.
release #num: Reference to release number ‘num’. This is a system-wide number. Release numbers, or IDs, are visible in the ‘Files’ main page by hovering over a release name with the mouse pointer. This reference links to the project file manager page, where the referenced release is highlighted in the list.
Creating or Updating a Reference Pattern
When creating or updating a reference pattern, one has to fill the following fields:
Reference Keyword: This is the keyword that triggers a reference creation when it is found. It should be concise and meaningful in order to facilitate readability.
Reference Description: Short description of the reference. It is displayed in a tooltip when the mouse cursor is over an identified reference.
Reference Link: This is the URL pointed by the reference, i.e. the address the user will be redirected to when clicking on a reference. The URL does not need to point to the Tuleap server: you may create references pointing to external pages. The page will be loaded in the current window.
A few keywords can be inserted into the link: they will be automatically replaced by their value:
$projname: short name of the project.
$group_id: project number.
$0: The keyword extracted for this reference.
$1: The first parameter in the reference.
$2: The second parameter in the reference.
$3…$9: Up to nine parameters in the reference.
Examples:
artifact #25: ‘$0’ is ‘artifact’, ‘$1’ is ‘25’
wiki #tuleap:Welcome/1: ‘$0’ is ‘wiki’, ‘$1’ is ‘Welcome’, ‘$2’ is ‘1’, ‘$projname’ is ‘tuleap’
myref #123:1/23/456: ‘$0’ is ‘myref’, ‘$1’ is ‘1’, ‘$2’ is ‘23’, ‘$3’ is ‘456’ and ‘$group_id’ is ‘123’
google #tuleap/enalean: ‘$0’ is ‘google’, ‘$1’ is ‘tuleap’, ‘$2’ is ‘enalean’. If you define the reference pattern ‘google’, with its link pointing at https://www.google.com/search?hl=en&q=$1+$2, clicking on the reference ‘google #tuleap/enalean’ will create a google search for ‘tuleap enalean’.
ds #123: ‘$0’ is ‘ds’, ‘$1’ is ‘123’. If you define the reference pattern ‘ds’, with its link pointing at https://docushare/dsweb/Get/Document-$1, clicking on the reference ‘ds #123’ will download document ‘123’ from your local DocuShare server.
You should also note that the number of parameters is important: if the number of parameters used in the text does not match the number of parameters needed by the reference pattern, the reference will not be extracted. This allows one to create several reference patterns with the same keywords but different number of arguments. See for instance the ‘wiki’ references: ‘wiki #Welcome’ is a reference with one parameter, and it links to the wiki page ‘Welcome’, while ‘wiki #Welcome/2’ is another reference with two parameters that links to the wiki page ‘Welcome’ at version ‘2’.
Enabled: Toggling this check box will simply disable (or enable) the reference pattern. Disabling a reference pattern just means that it is no longer extracted from text fields or commit emails. Re-enabling the reference pattern is possible. See also “Deleting a Reference Pattern” below.
Deleting a Reference Pattern
Project reference patterns can be deleted. They appear with a small trash icon in the reference pattern list. Just click on this icon to delete the reference pattern from the database. A deleted reference pattern must be re-created if you need to use it again.
System reference patterns cannot be deleted. However, you can disable them so that they will not be extracted.
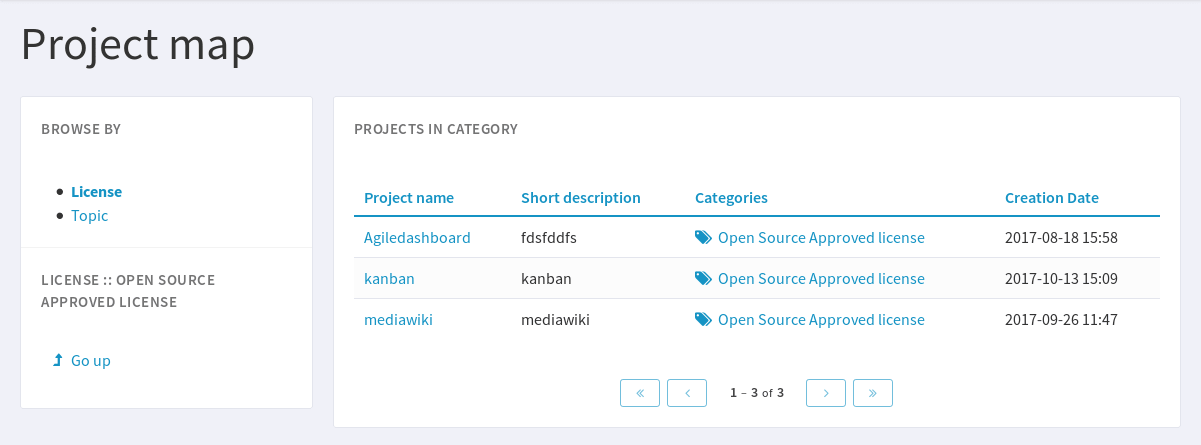
Categories
In “Categories” tab, you can categorize your project. You can define up to 3 values for each of the criteria used in the Software Map. If you cannot find any matching value in the predefined list do not hesitate to contact the Tuleap Team.
Software map will allow users to find your project with the chosen categories.
Project Structure Export
In “Project XML export” menu you can export the project structure as a zip archive. Data are not exported.

If you want to export project with data, please see Project export and import
Project Data Export
Tuleap is very appealing to many project development teams because it provides full-featured project development and management tools. A software project can be managed almost entirely from within Tuleap. However a project team may need to perform some additional processing on the project data. It may need to report about progress made, what goes well or wrong, how far you are from the end date, derive statistical data, etc.
It is far beyond the scope of Tuleap to provide project teams with such reporting tools. There are many specialized tools on the market to generate progress reports and each project team has its favorite one. In order to satisfy this diversity of needs, the Tuleap Team has developed a very efficient system that allows the project team to export the project data outside of Tuleap for re-use in other tools like MS Access, Excel, Crystal Report, Open Office, or any other ad-hoc tools.
Note
This feature is deprecated and should not be used anymore.
Text File Export
Text File Export follow the well known CSV (Comma Separated Values) format, recognized by almost every Office Suite on the market. It can easily be imported in MS-Access, MS Excel, OpenCalc…
Project History
The Project History provides project members with Audit capabilities. Clicking on this menu item shows a list of all the changes that have taken place in the administration of the project since its creation. The list of changes reports the nature of the change (e.g. Changed Public Info, Changed Permissions, Changed Software Map, …) , what the value was before it changed (if applicable), who changed it and when.
Access Logs
Depending on the configuration of the Tuleap site and on the configuration of each project, source code access, documents and file release download permissions may be granted to various populations.
The Access Logs provide project members with a complete audit trail of who accessed what on the project. The page shows the following information:
The downloaded File Releases. It basically reports who downloaded what file and when (date and time). The time of download is reported in local time relative to the project member time zone.
The Tuleap users who accessed the source code through the Subversion repository.
The Tuleap users who downloaded documents, except for those documents marked as being accessible to anonymous users in your Document Manager.
Access Logs can be filtered out by users to show accesses from all users, project members or non project members (default). The time window can also be adjusted to show more or less access log history.
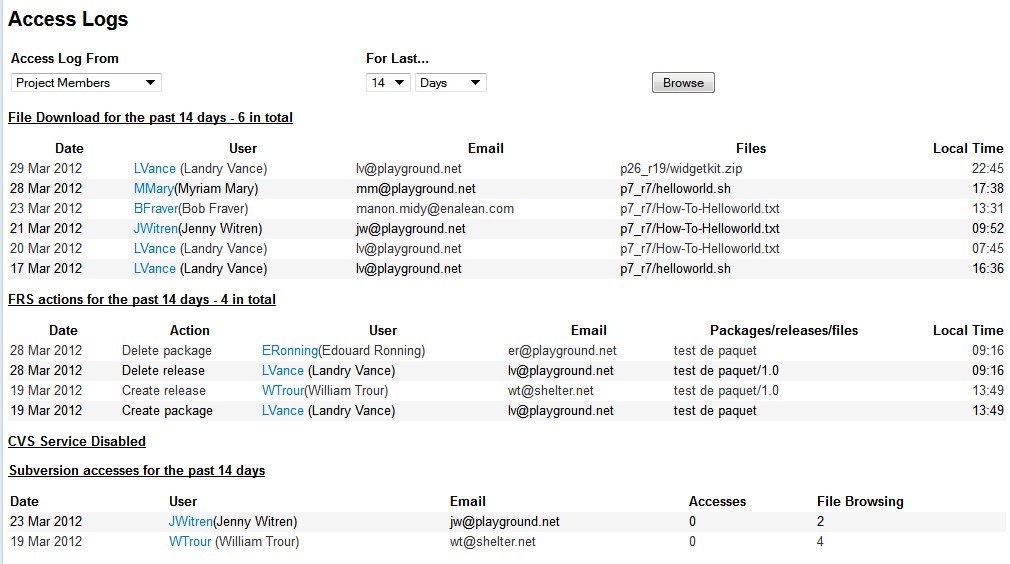
Sample Access Log
Project Links
Project Links superimpose a structure onto Tuleap project workspaces making easily visible the relationships between projects, and they can simplify finding related project. Applications include:
Project families so that a parent project workspace can gain easy access to its child projects (for example for programme management).
Rings of interest, where several projects may decide they have sufficient in common that they wish to be related (e.g. projects that use the same technology), but none of them is strictly a master, and each is free to join or leave the ring.
Linking a product-related workspace with a support project that covers a number of products - i.e. an easy linkage from the product to its support and from generalised support to a specific product (note that this is a simplified project family, with each project showing the other as a relation).
To create a project relationship, a project first defines a link type and then assigns that link type to as many projects as it wishes. The link type is named in any way (except it must be unique within the project), for example “Sub-projects”, “Related projects”, “Division”, “Team”, “C++ Projects”. The main use of the name is as a heading when the linked projects are listed.
When referring to a relationship link, the project that administers the link is the owner and the project referenced by the link is the target of the link. A link type also specifies a reverse name, which is used when a project lists those of which it is the target. For example “Children” may be the name of a link type and “Parent” the reverse link name for that same link type. Projects linked this way would be listed under “Children” in the owner project, but those projects would see the (reverse) relationship as “Parent”.
To create a “ring of interest”, someone must take responsibility to create (and administer) a ringmaster project (which behaves just as a parent project in a project family but its only function is to be the owner project links) - the ring administrator would normally take responsibility to be the ring animator (the one who makes the ring works well). To join a ring of interest, a project must request the ring animator to create a relationship with it in the ringmaster project.
When a new project is created from a template project it inherits a copy of all the project links (and link types) from the template. Additionally, any project that references a template as a target will gain a link to the new project (it means that the project wants all projects created from the template to be linked as the template is). Thus a master project may keep tabs on all projects created from a template, and a ring may automatically expand. There is also a mechanism that allows projects to resynchronise link types with their template. Newly created links are highlighted with a faint yellow star - mainly to highlight those created from template links.
A project shows reverse linkages (those projects for which it is the link target) on the summary page.
Terms and Definitions
Term |
Definition |
|---|---|
Data Aggregation |
The process of collecting data from related projects for display in a collated form. |
Link Administrator |
The users who are allowed to create link types and to modify project linkages - project administrators are automatically link administrators. |
Link Type |
The data item that defines the properties of a project linkage and gives it a name. They are defined within a project, and are inherited from a template. |
Owner |
The project that is responsible for creating and administering a link. |
Project Family |
A strict hierarchy where there is a parent project with one or more child (or sub-) projects. |
Project Link / Relationship Link |
The data item that joins one project with another to create related projects - an instance of a project link type |
Related Projects |
Two projects for which there is a link entry in at least one of them pointing to the other. |
Reverse name/linkage |
The name (defined in the owner project) to be used to describe the relationship within its target projects’ context (e.g. parent and children). |
Ring of interest |
A group of projects that have declared themselves as having something in common and are linked together to share information. |
Ringmaster |
A project that exists (only) so that other projects may reference it to become members of a ring. |
Target |
The project that is the subject of a link from another project. |
Project links terms and definitions
Creating links
A project administrator may add new related projects by using the following procedure:
On the ‘Project Links Configuration’ page of your master project, first set up at least one link type (if none already exists) by clicking ‘Add a project link type’.
Then tick the “Create Project links from this project” box and follow this process:
go and find a project you want to link by any means you like (via My Personal page, project tree, browsing, favorites, …)
click on the “link to this project” button/icon on the summary page
this takes you back to the context of the master project, there you select the link type (from the presented list) and “add” the link
either go and find another project you want to link to (repeating the above steps), or uncheck “link to this project”
Note that “link to this project” is a personal setting, not a project one, so you can leave it checked all the time if you wish, which leaves visible in all projects visited the “link to this project” button/icon on the summary page. Checking it in another project just makes that one the future master, there’s no need to uncheck it first.
Link Administration
Administration of the linkage belongs to the link owner project, the project to which the link points is called the target project (the link target).
Project administrator users are automatically link administrators.
On the (link) administration page, the project’s link administrator user may:
Add new link types.
Modify (including change the link type of) existing relationships with target project.
Delete individual project relationships (i.e. remove them from the list of related projects).
Delete relationship types - all referenced projects with that relationship are disconnected (i.e. the whole relationship is deleted).
Refresh link types from the project’s template (if it has one, see details below)
Clone link type: creates an exact copy of a link type (with a different name)
Modify link types (all attributes)
Note that a project relationship linkage has an explicit direction (owner project and target project); only the owner project link administrator can establish and remove project links.
Ring Administration
A ringmaster project is a special type of project that just displays the list of projects linked to it using a ring-type link.
Template Projects
The following are inherited from a template project at project creation:
Project link types
Related project
If a template project is the target of a relationship, the new project is (automatically) added to that linkage at project creation.
When a project is refreshed from its template, the following actions are proposed to the user for individual confirmation:
Link types defined in the template and not present in the target project are added (thus types recently added to the template can be adopted into the project).
Link types sharing a name with the template project are replaced with the template ones (i.e. types with the same name in the template and project are assumed to be the same; and it is assumed that the template is the master, so they are copied from the template overwriting the project’s version, if confirmed)
Linked projects in the template that are not linked to by the project are added.
Projects that specify the template as target but do not link to the project are identified for information only (i.e. if the project were being newly created, it would be added automatically to the master project’s links, but when refreshing we can’t be certain that it has not been deleted by that project, nor that it is really wanted as a link).
Ringmaster projects referenced by the template are offered to join the ring.
Note: link types that are defined in the target project but not in the template project are neither modified nor deleted - no proposal is made to the user; they are listed for information only.
No mechanism is proposed for a template project to force an update upon its offspring; the template administrator user must ask the project administrators to do the refresh themselves.